Documentation for Evenx - Event Conference WordPress Theme
Evenx / Event Conference WordPress Theme v2.2
Getting Started #back to top
- Item Name : Evenx - Event Conference WordPress Theme
- Item Version : V 2.2
- Author : XpeedStudio
- Support Desk : Get Support
First of all, Thank you so much for purchasing this theme and for
being my loyal customer.
You are awesome!
You are entitled to get free lifetime updates to this product +
exceptional support from the author directly.
Be careful while editing
the template. If not edited properly, the design layout may break
completely.
No support is provided for faulty customization.
Introduction and quick start guide. #back to
top
Thank you so much for purchasing our theme called Evenx - Event Conference WordPress Theme. Please feel free to contact us if you have questions or problems about this theme. No guarantee is provided, but we will do our best to provide you with the best possible assistance.
First Step
- Documentation - That's where you
- License - Some info's about theme licencing terms
- Dummy Content - Placeholder content for testing the theme
- SampleData - Import Data to get the exact Site as the Preview Page
- Upload - This is where all Theme files are (zipped & unzipped format)
Please read more about WordPress here
What are Parent and Child Themes?
A WordPress child theme takes the functionality of another theme, named parent theme. It gives you the possibility to customize an existing theme. Instead of modifying the theme files directly, you can activate the child theme and work within it.
All customizations are stored in the child theme and anything in the child takes priority over the parent. So if the same file exist in both child and parent, the file from the child will control that aspect of the theme.
Working with child themes, your customizations are safeguarded from future upgrades because you only upgrade the parent theme, which you never edit, while the customizations are protected in your child theme which you don’t upgrade.
Why use a Child theme?
Safe Updates. You can easily modify your website using child themes without ever changing the parent theme. When a new version of the parent theme appears, you can safely update it as all your modifications are saved in the child theme. Easy to Extend. A child theme has a great flexibility. It does not require writing a lot of code. You can modify only those template files and functions that you need.
Install Theme
The first option how to install this Theme would be to directly upload the Evenx.zip file via WordPress Theme Uploader.- Minimal requirements:
- PHP 7+
- Php.ini settings:
max_execution_time = 600 upload_max_filesize = 265M post_max_size = 265M memory_limit = 512M max_input_time = -1 max_input_vars = 8000 - MySQL 5.0+
- WordPress 5+
- Please make sure you have proper version of WordPress installed.
- Log Into WordPress and go to Appearance > Themes
- Find the Evenx Theme and click activate
- FTP Upload:
- Unzip the "Evenx.zip" file from theme folder
- Open up your FTP manager and connect to your hosting
- Browse to wp-content/themes
- Upload the Evenx in theme folder
- Log Into WordPress and go to Appearance > Themes
- Find the Evenx Theme and click activate
- WordPress Dashboard:
Also, you can install and activate the theme from your WordPress admin panel. To do that please follow the steps:
1. Go to the WordPress admin panel, Appearance > Themes and click on the Add new button
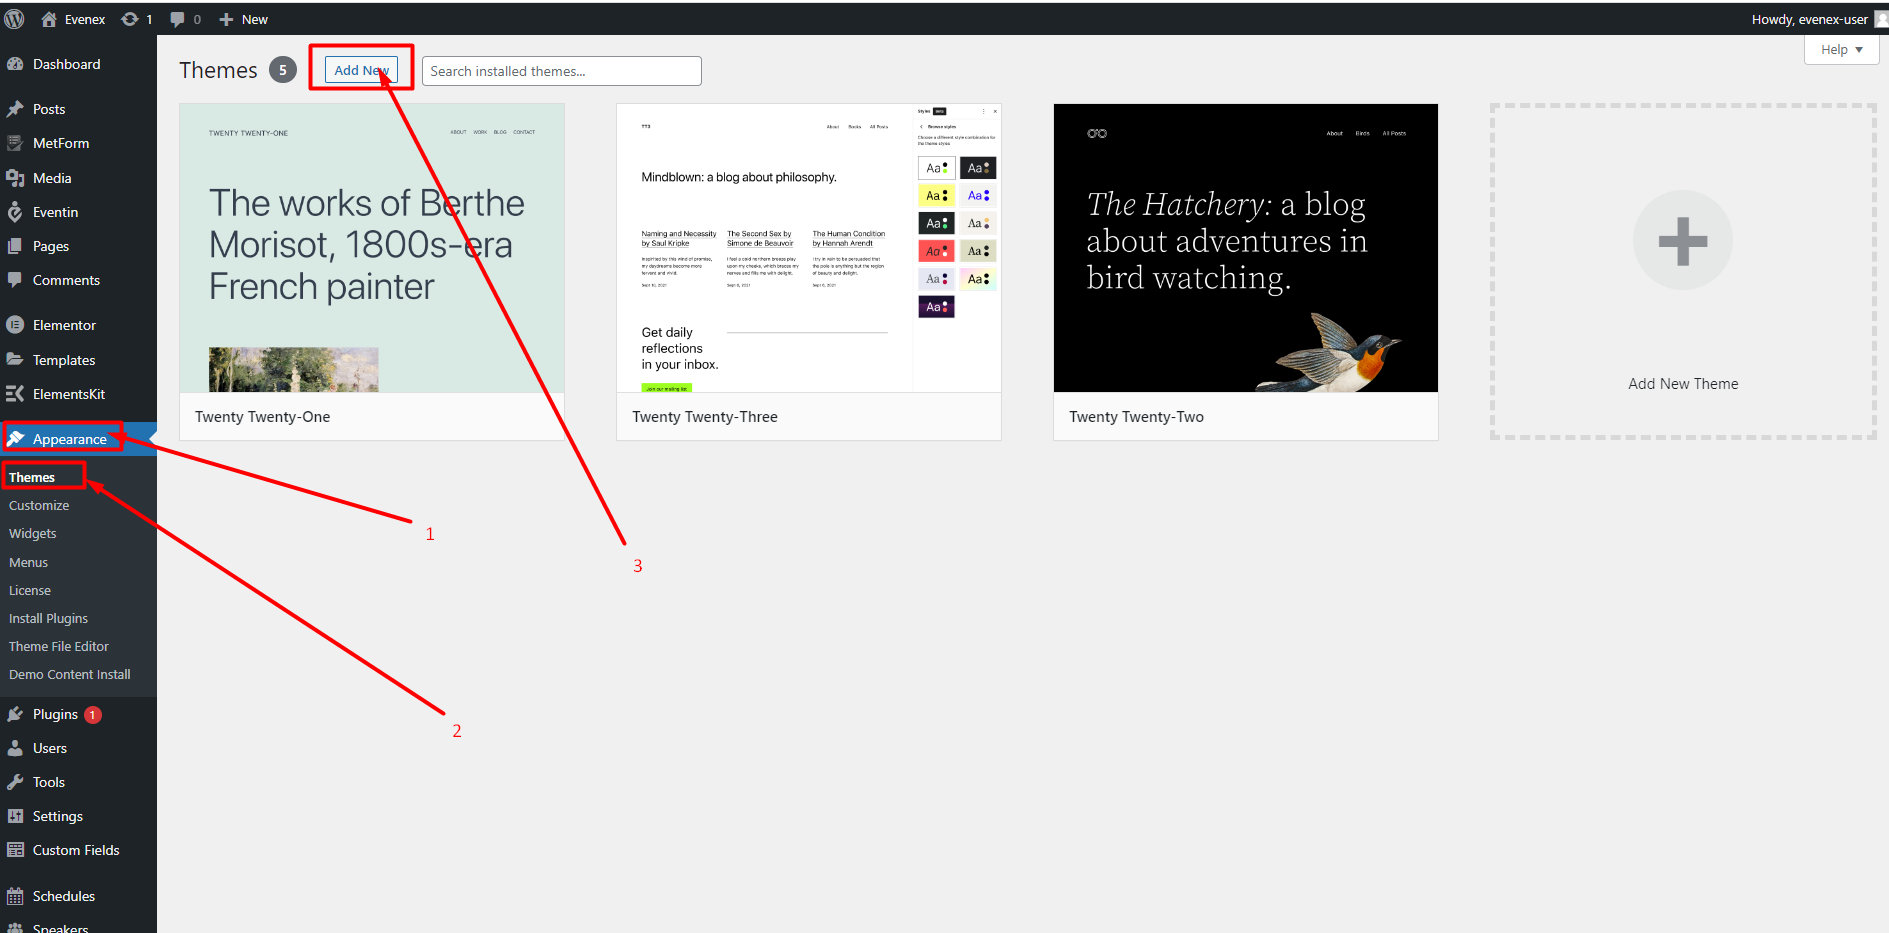
2. Click on the Upload Theme button, select or drag on drop the theme zip file, and click on install button

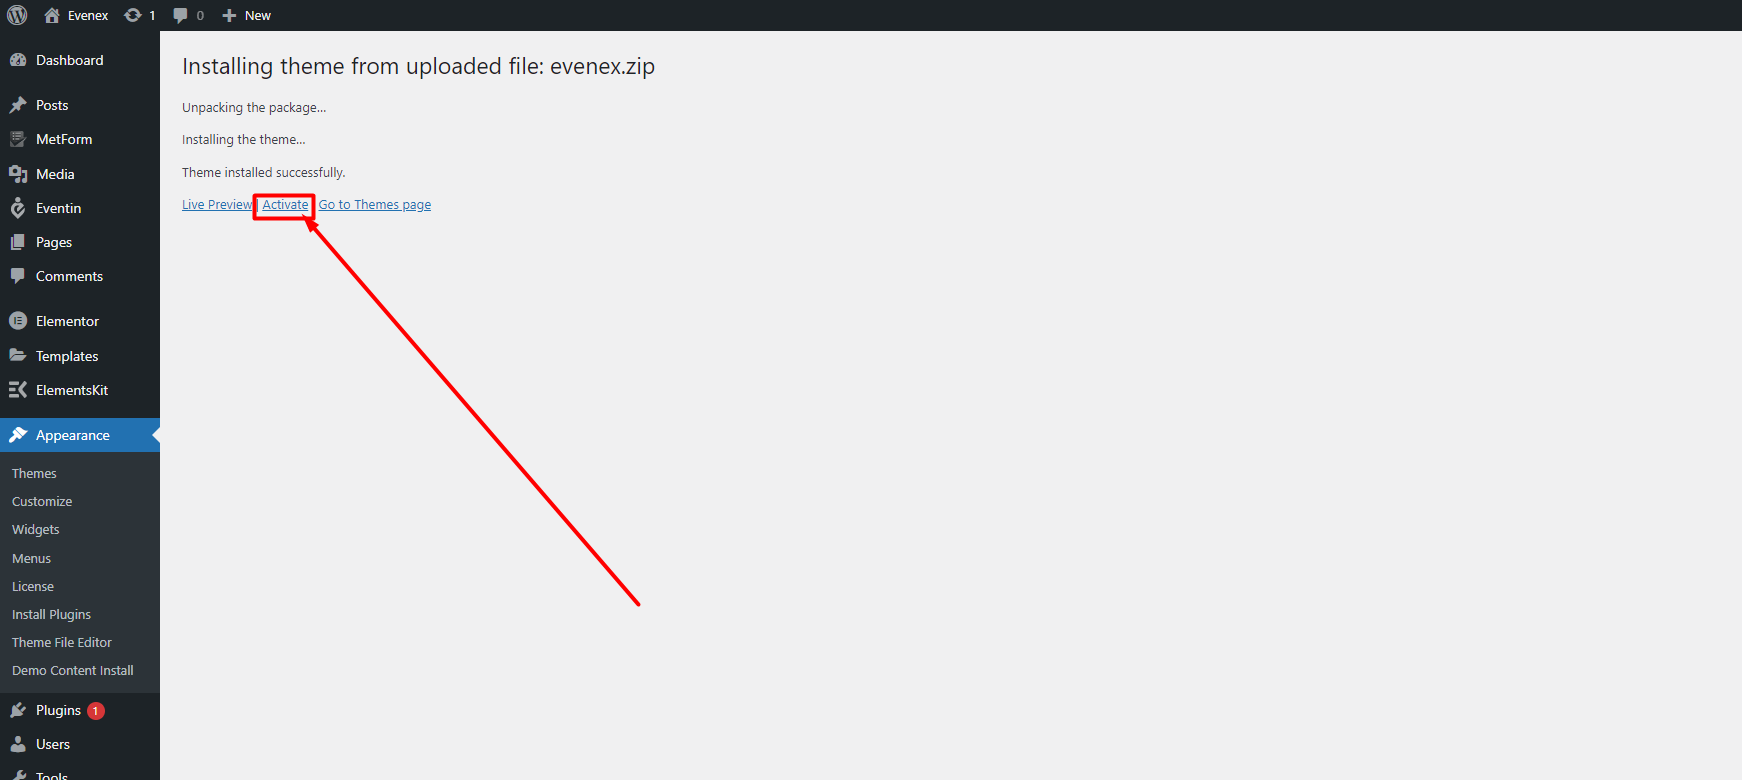
3. Once the theme is installed, click on the Activate button to activate the theme.
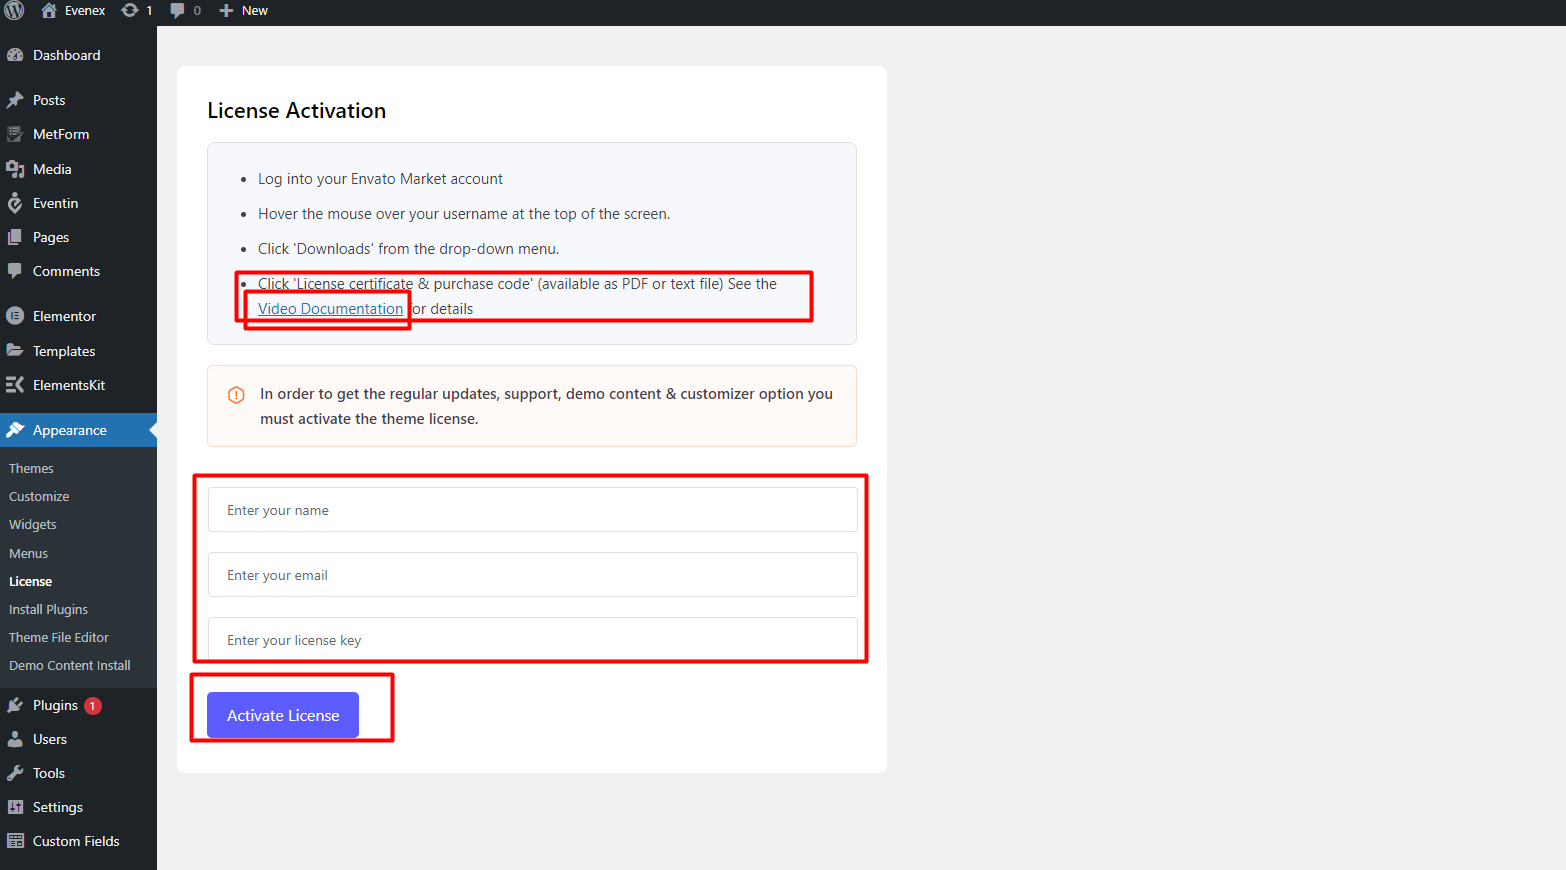
License Activation
The license menu you'll see only if you use the version 2.2 or higher of the theme.
To activate the license please go to Dashboard->Appearance->License. Here you need to enter your Name, Email, License key, and click on the Activate License button.
Please follow this video to find your license key.
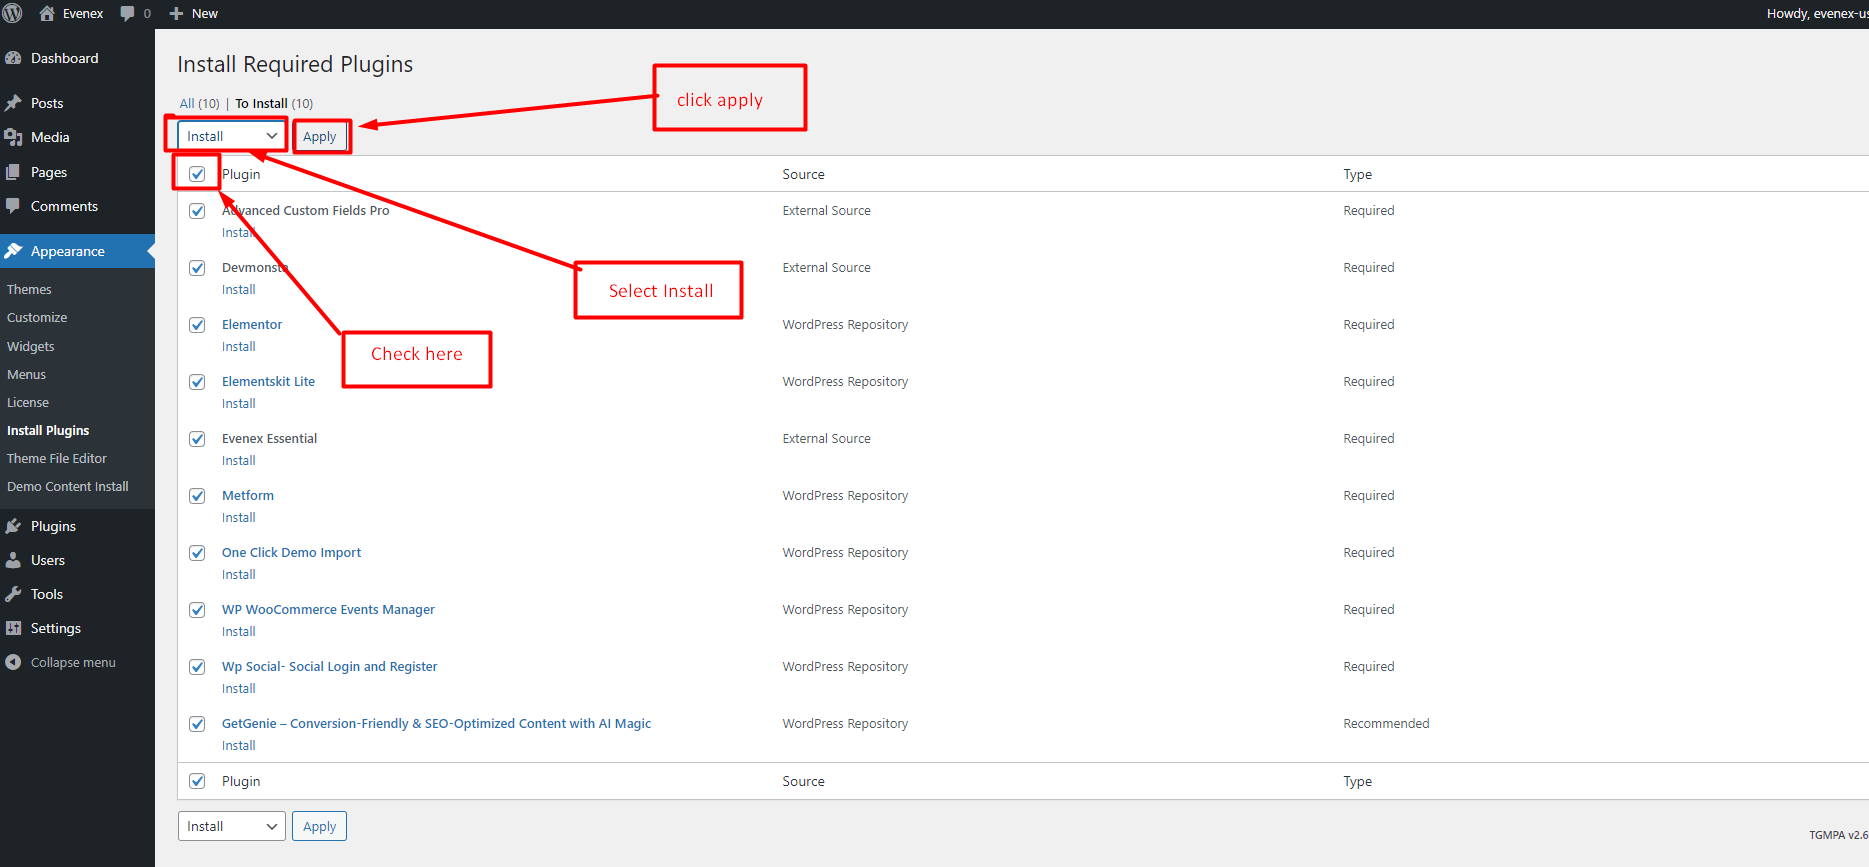
Required Plugis Installation and Activation
1. You will see a notice top of your dashboard. Click on the Begin installing plugins.
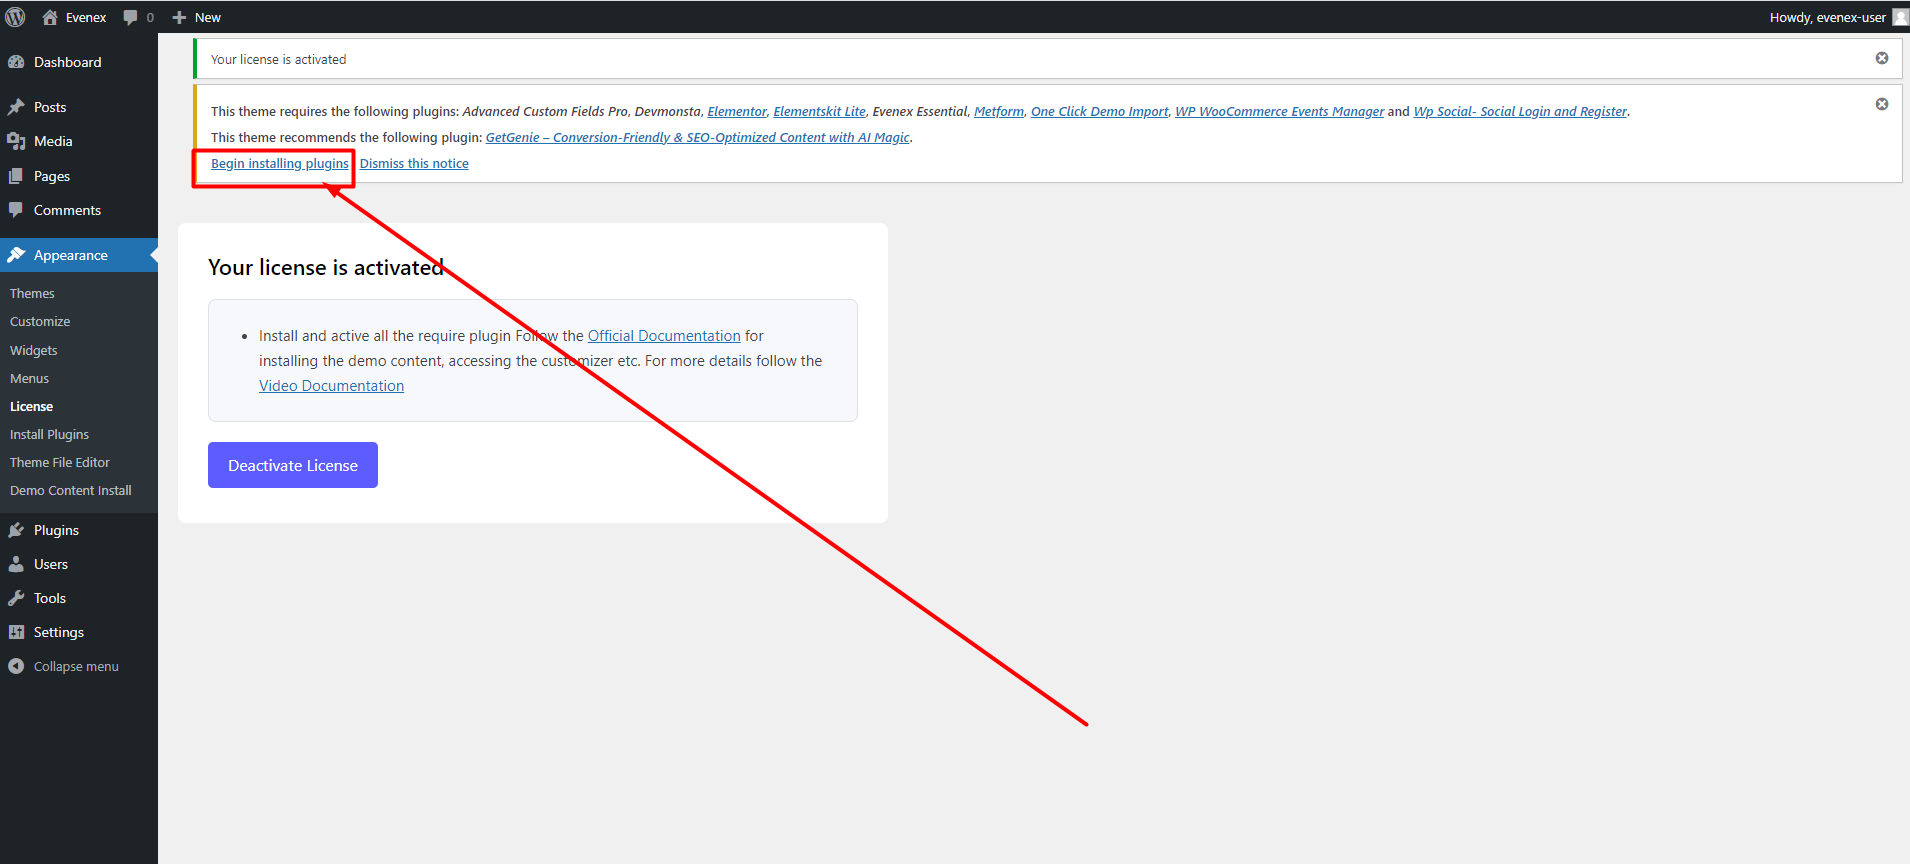
2. Here you need to checked all the required plugins, select the Install option, and click on apply. If you face any issue with bulk installtion please install one by one. Once the plugins are installed, please activate all the required plugins.
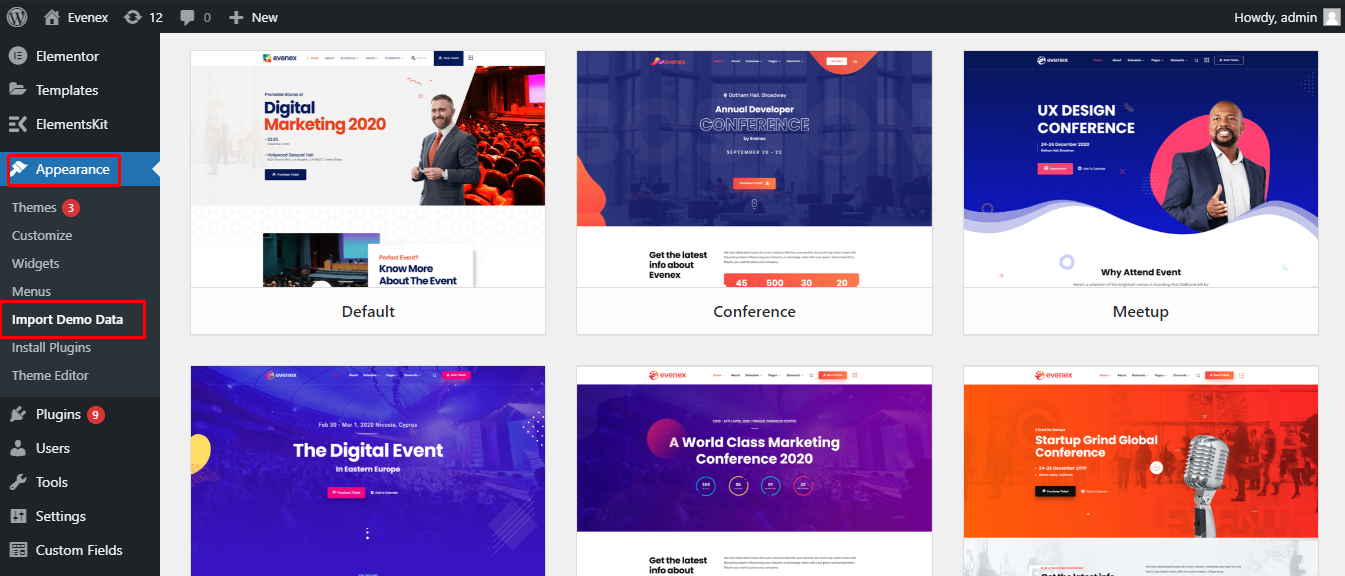
Install Demo Content
Install our readymade demo content from Dashboard->Appearance->Import Demo Data
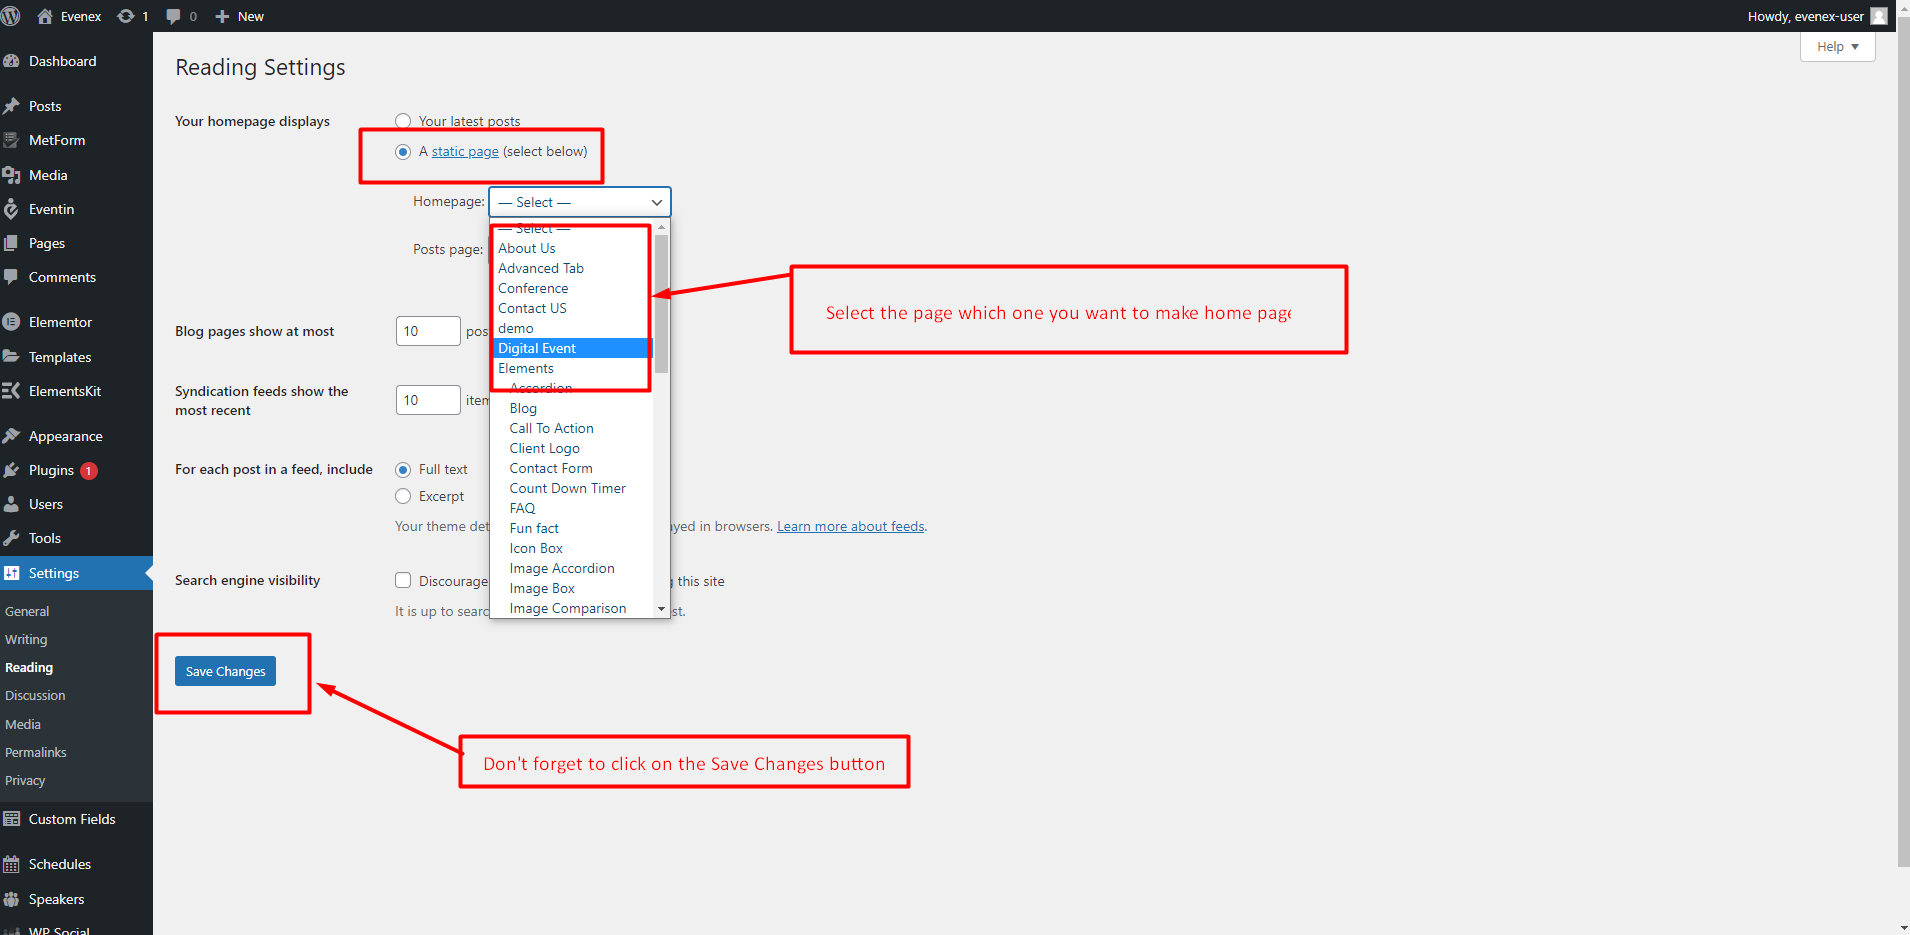
After intalling the demo content please set the homepage from Settings > Reading:
Theme Customizer
Logo with ElementsKit Header Builder
You can find all the Theme Options from Appearance-> Customize->Theme Settings
From Header and Footer Settings, you can change your logo, header style , menu styles etc. Watch the video for better guidance.
Footer builder Tutorial
From your Dashboard go to ElementsKit > Header Footer > click "Edit with Elementor"
Now Follow the tutorial to learn more.
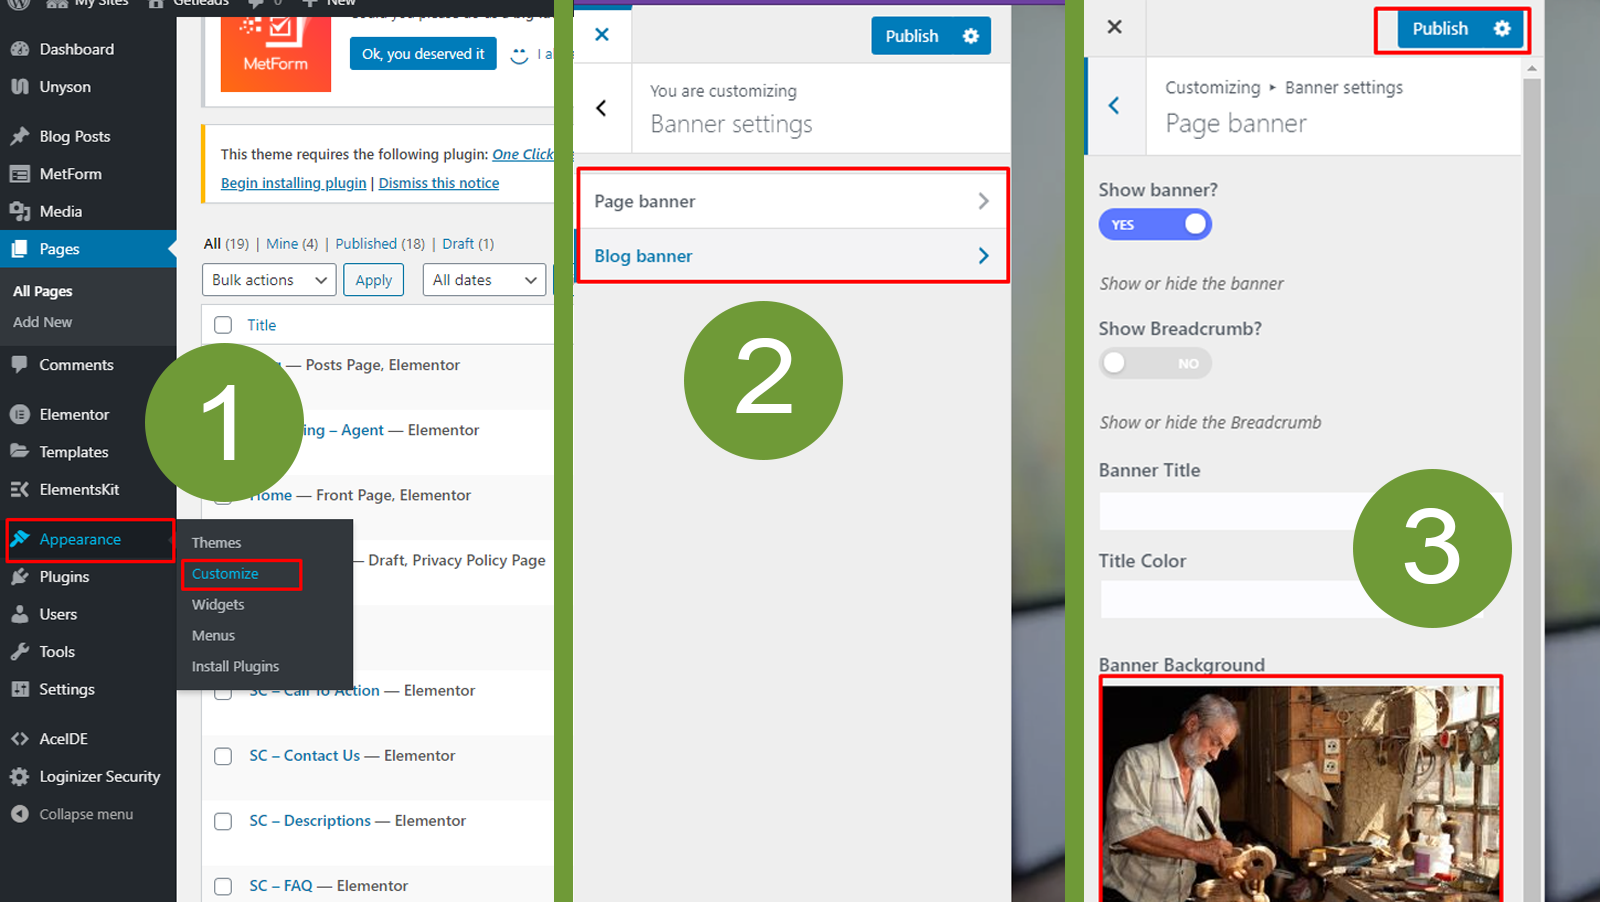
Page and Blog Banner
You will find this setting from: Dashboard > Appearance > Customize > Theme Settings > Banner Settings.
Pointer 2 : Here you have to select the banner type you want to work with.
Pointer 3 : Change the banner image and don't forget to click publish button to save your work.
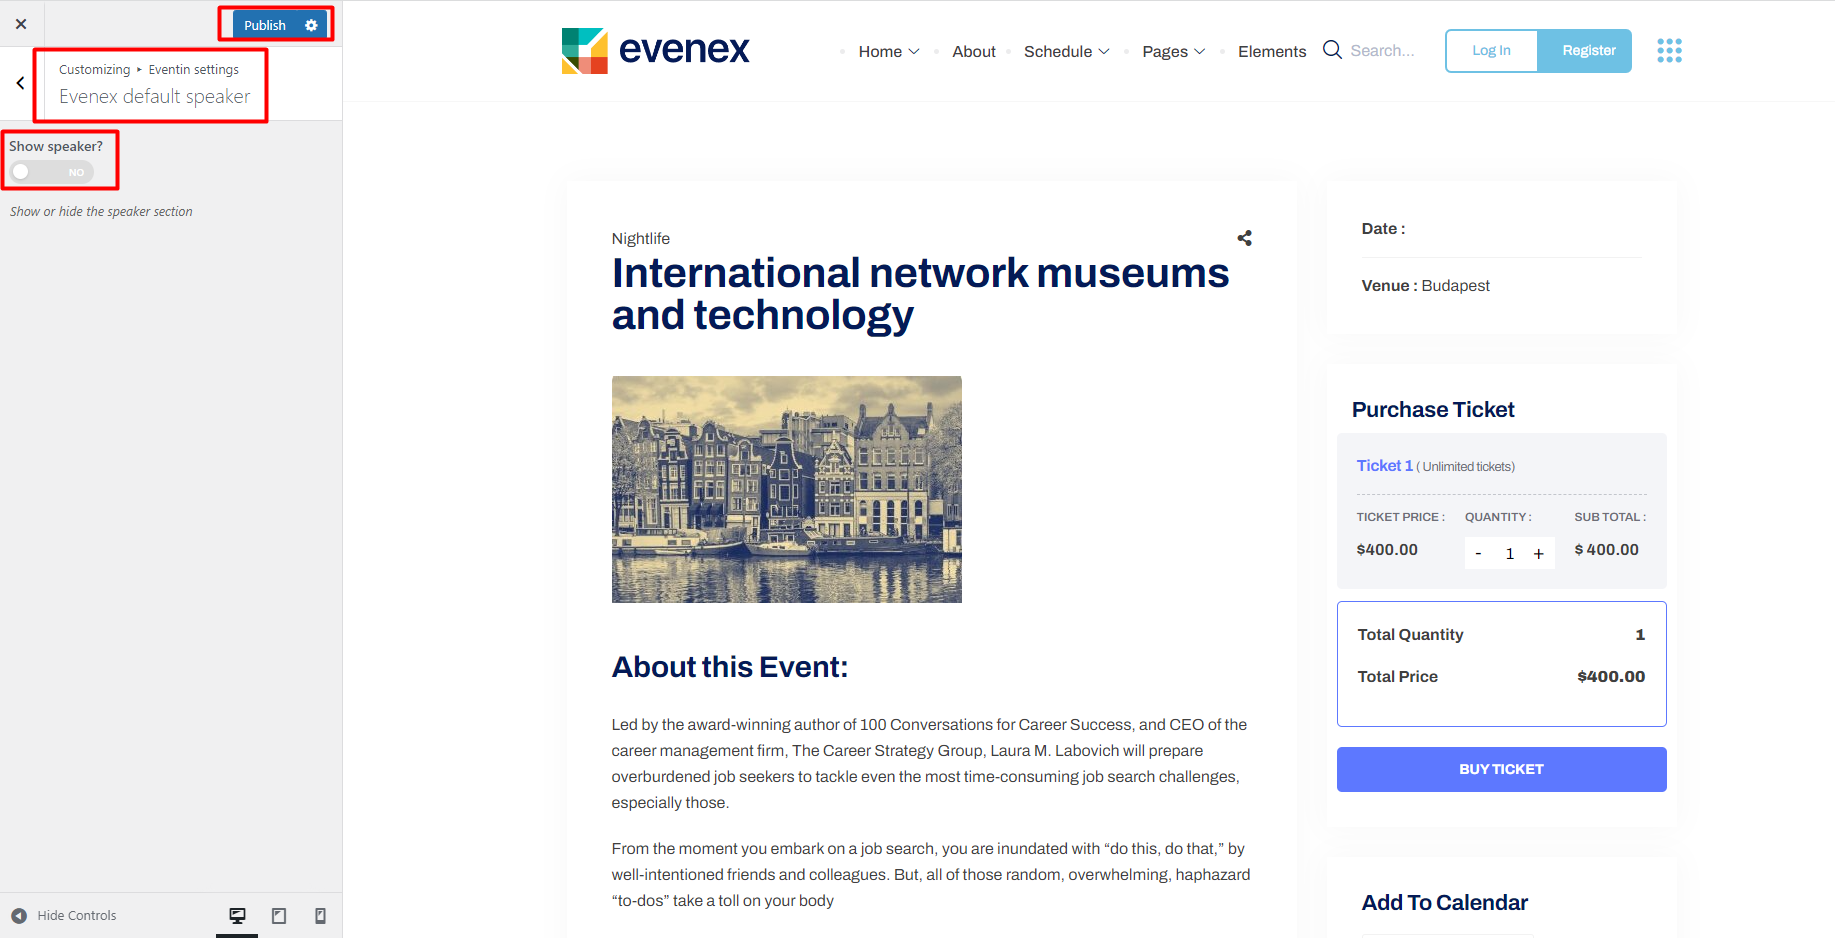
Evenex Default Speaker
You will find this setting from: Dashboard > Appearance > Customize > Theme Settings > Eventin Settings > Evenex Default Speaker.
Here you can see the default speaker hide/show option.
Use Readymade Demo
ElementsKit offers you more than 500 readymade demos for your wesite. You can use them according to your needs.
watch the video to understand in detail.
Metform Customization
Evenx theme comes up with the most reliable and fexiable form builder called Metform. Watch the tutorial so that you can understand how it works
Click here for Metform Playlist tutorialGetting started with Elementor
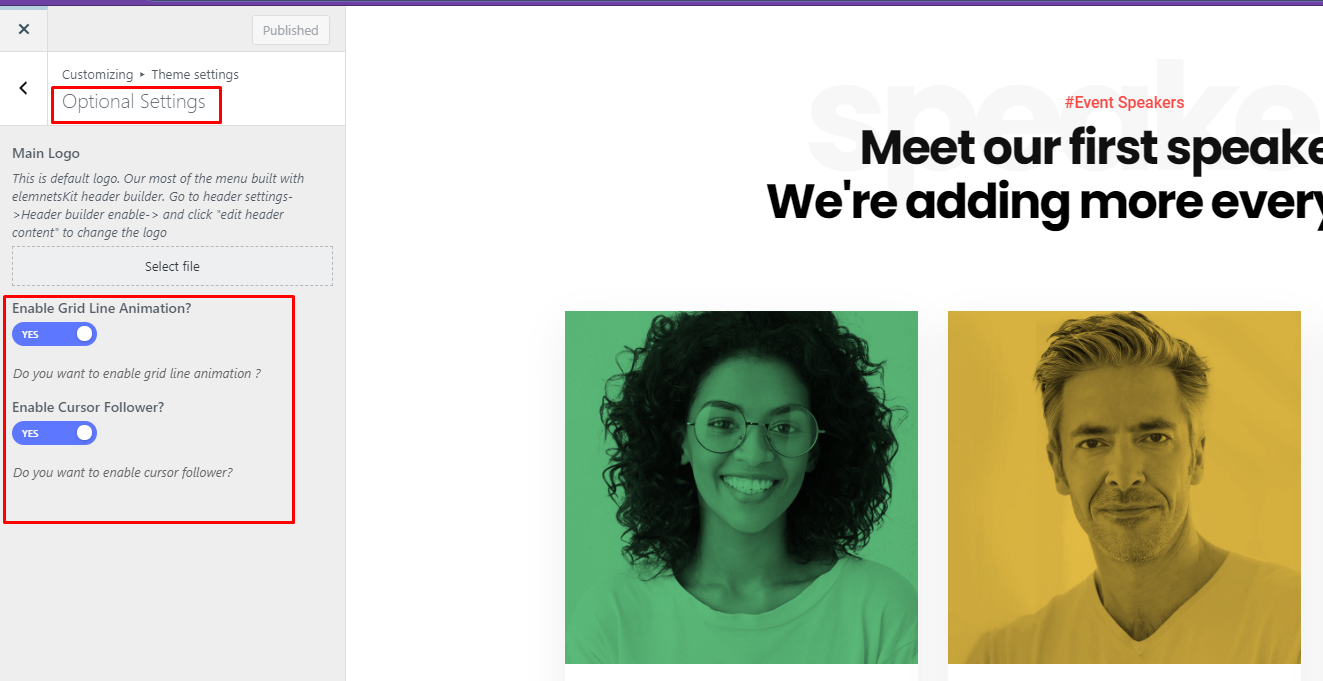
Grid Line Animation & Curson Follower
You will find this setting from: Dashboard > Appearance > Customize > Theme Settings > Optional Settings.
CSS Customization#back to top
Create a css file name style.css file on
Evenx-child\style.css folder and write your own css
customization.
Some characteristics of the style.css file
- The file is not included by default
- The file is the last file to be loaded in your site.
Main css file is Evenx/assets/css/master.css
What is a Child Theme?
As indicated in the overview, a child theme inherits the look and feel of the parent theme and all of its functions, but can be used to make modifications to any part of the theme. In this way, customizations are kept separate from the parent theme’s files. Using a child theme lets you upgrade the parent theme without affecting the customizations you’ve made to your site.
Child themes:
- 1.make your modifications portable and replicable;
- 2.keep customization separate from parent theme functions;
- 3.allow parent themes to be updated without destroying your modifications;
- 4. allow you to take advantage of the effort and testing put into parent theme;
- 5.save on development time since you are not recreating the wheel; and
- 6.are a great way to start learning about theme development.
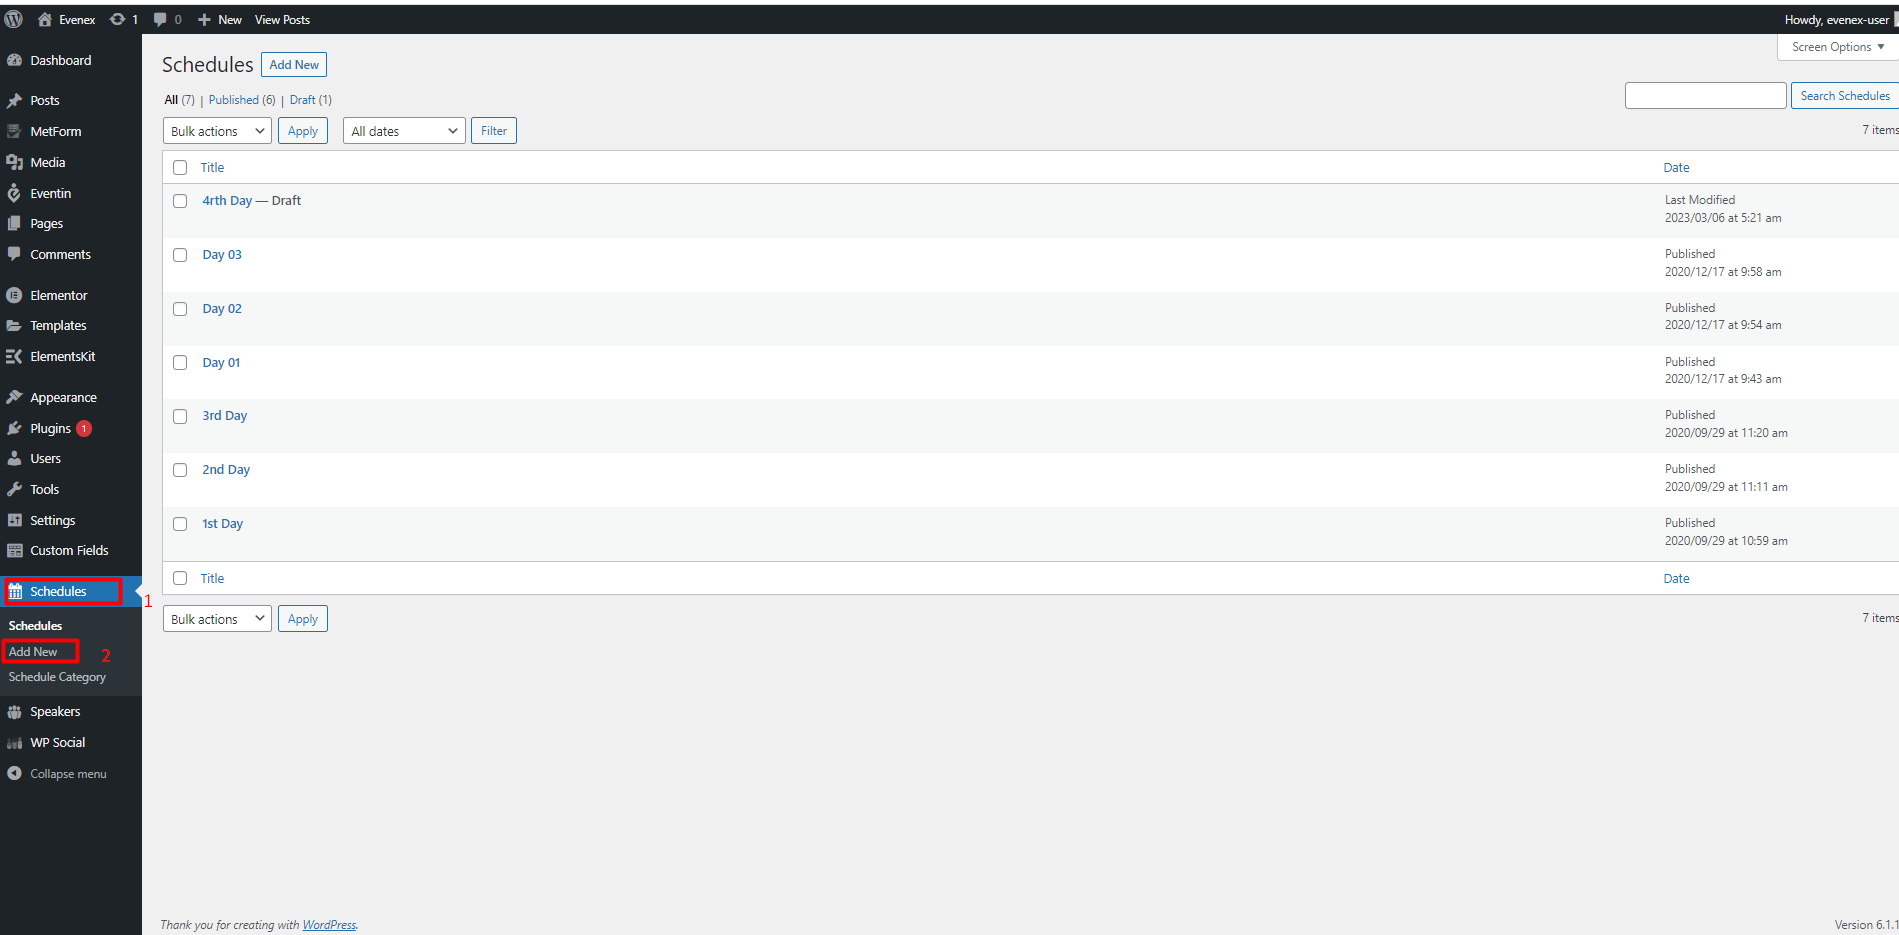
Evenex Schedules#back to top
Note: If you use the Eventin plugin to create event then please use the Eventin Schedule
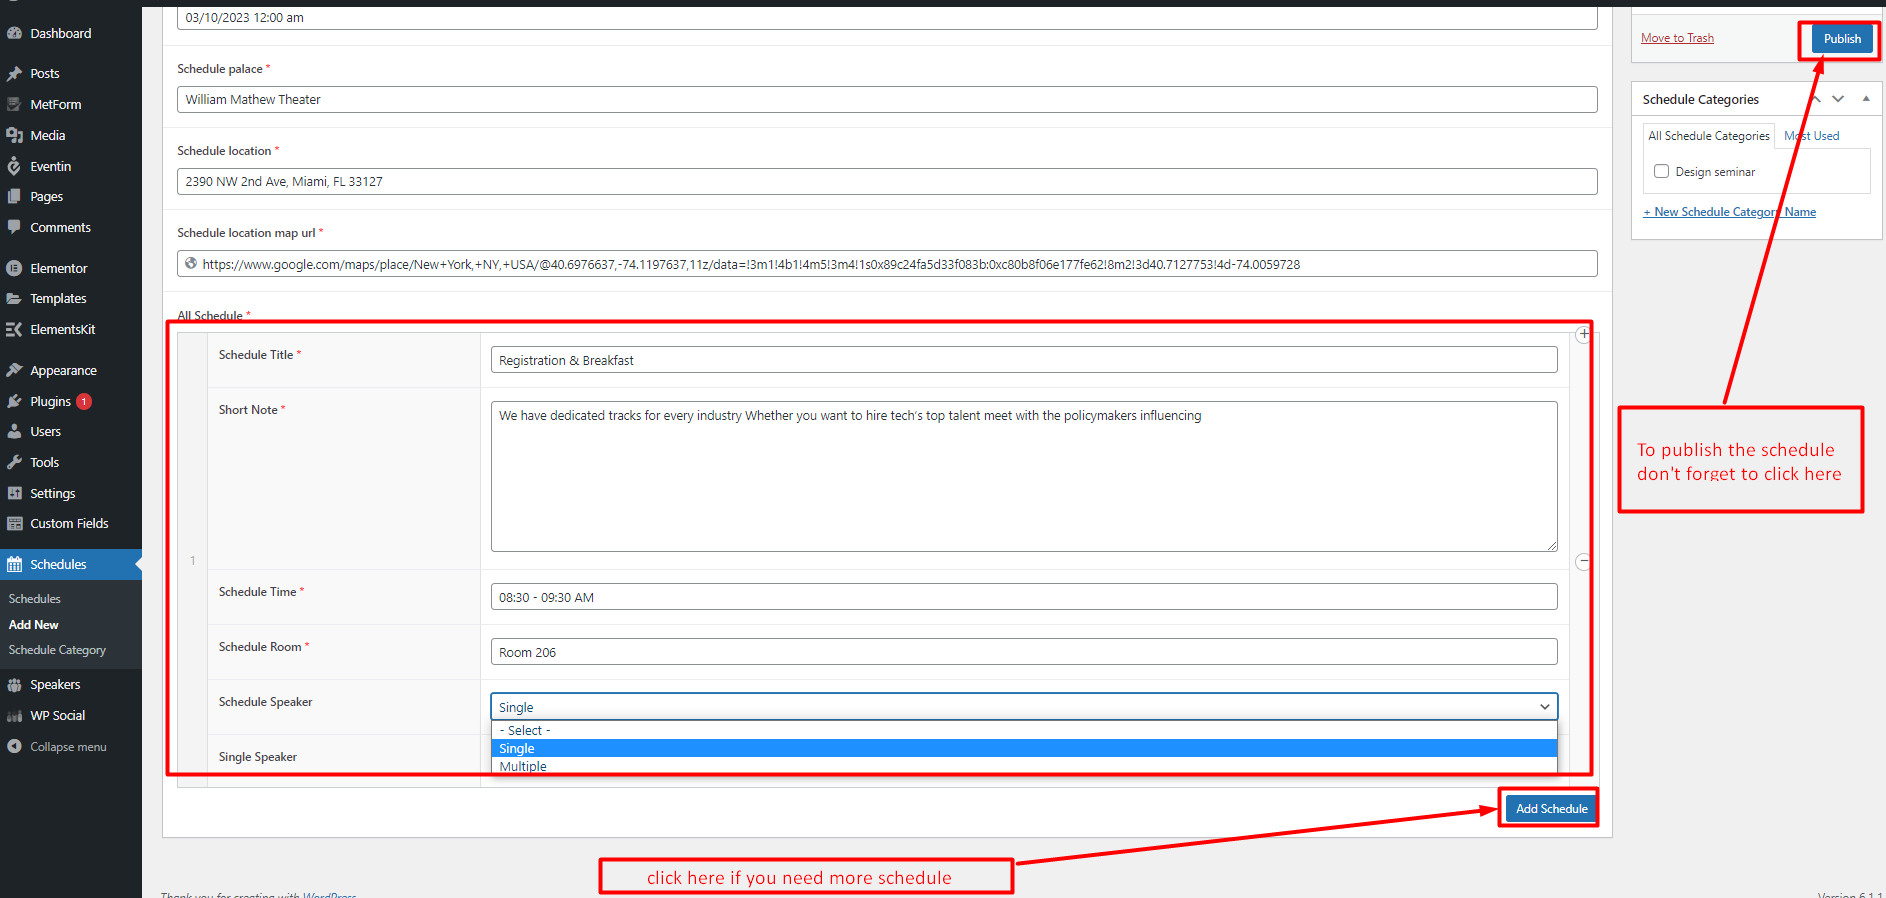
1. To create a new schedule go to your Wordpress admin panel, Schedules > Add New:
2. Enter the inputs (Required field *) and click on the Add Schedule button to add schedule
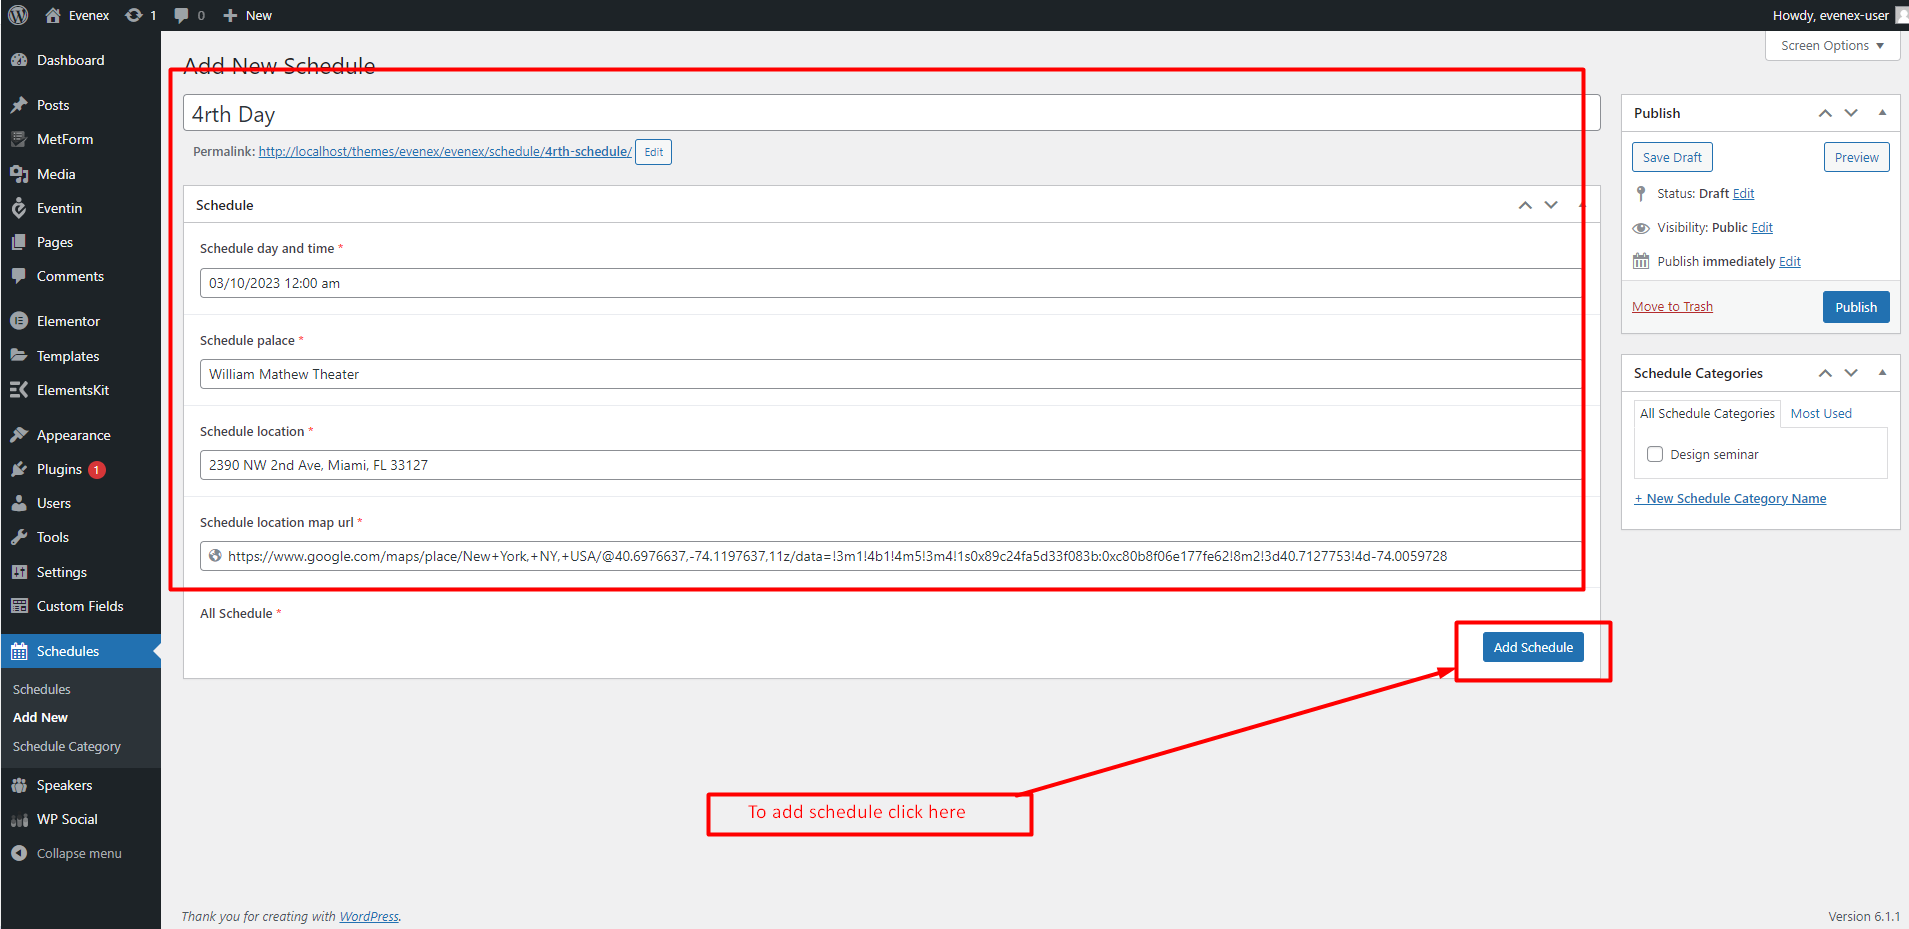
3. Enter the inputs and click again on the Add Schedule button if you need more schedule. Don't forget to click on the publish button to publish the schedule.
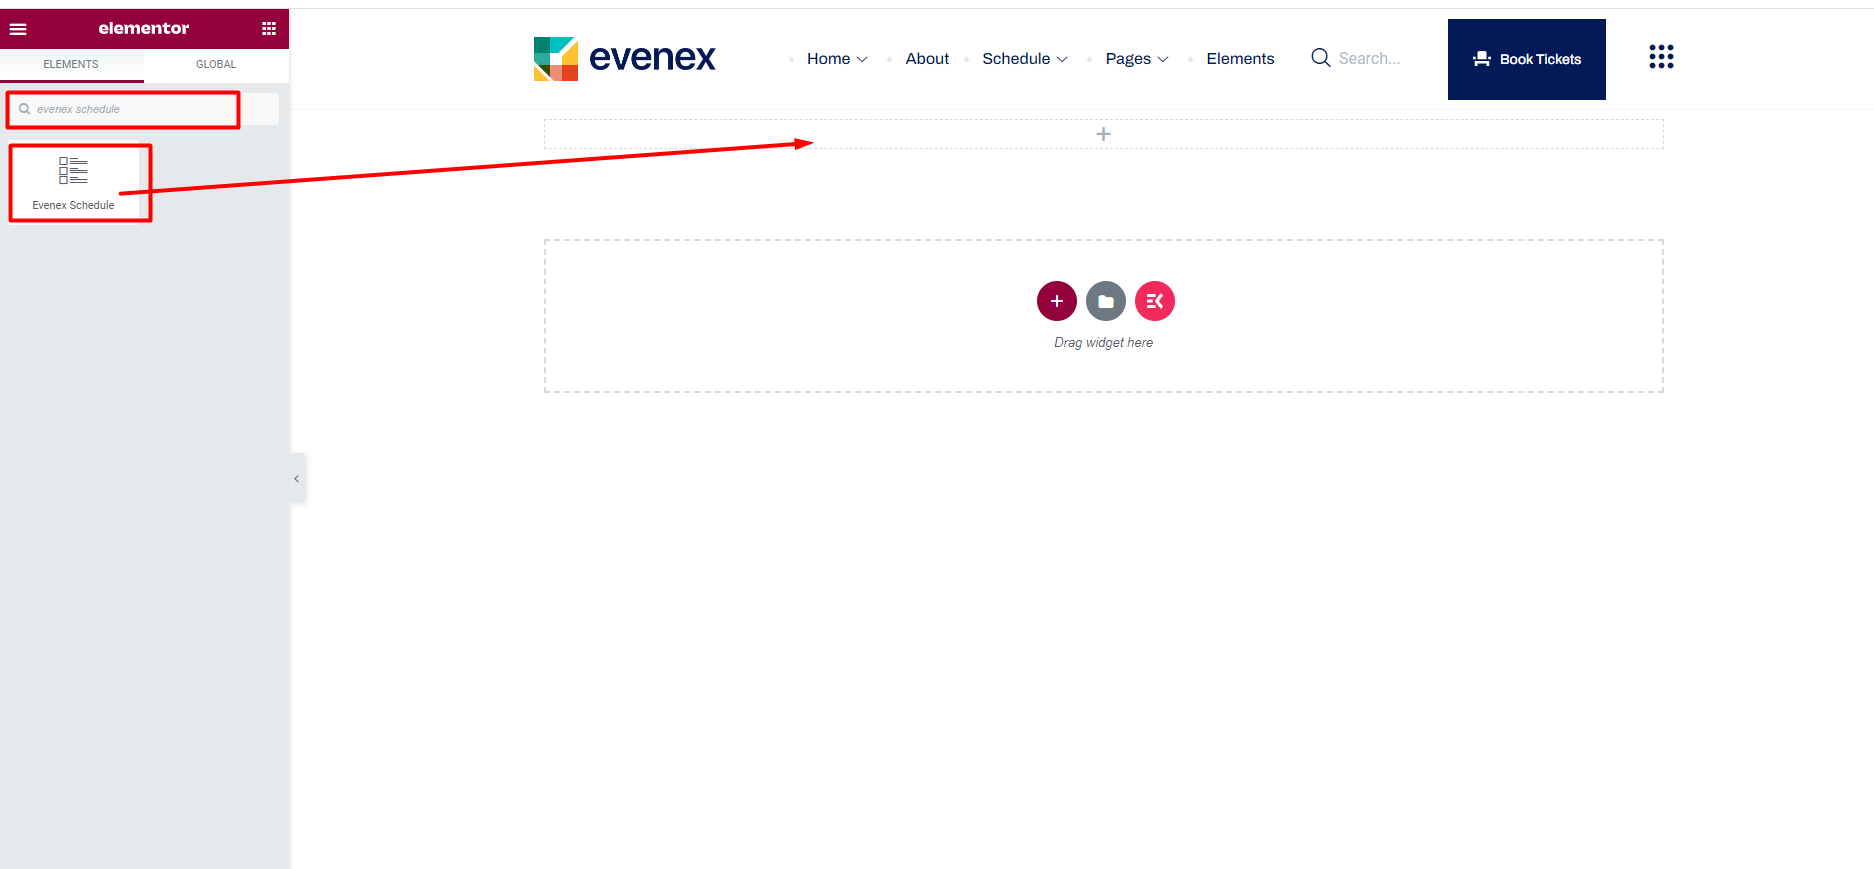
4. You can use the Evenex Schedules as elementor widget.
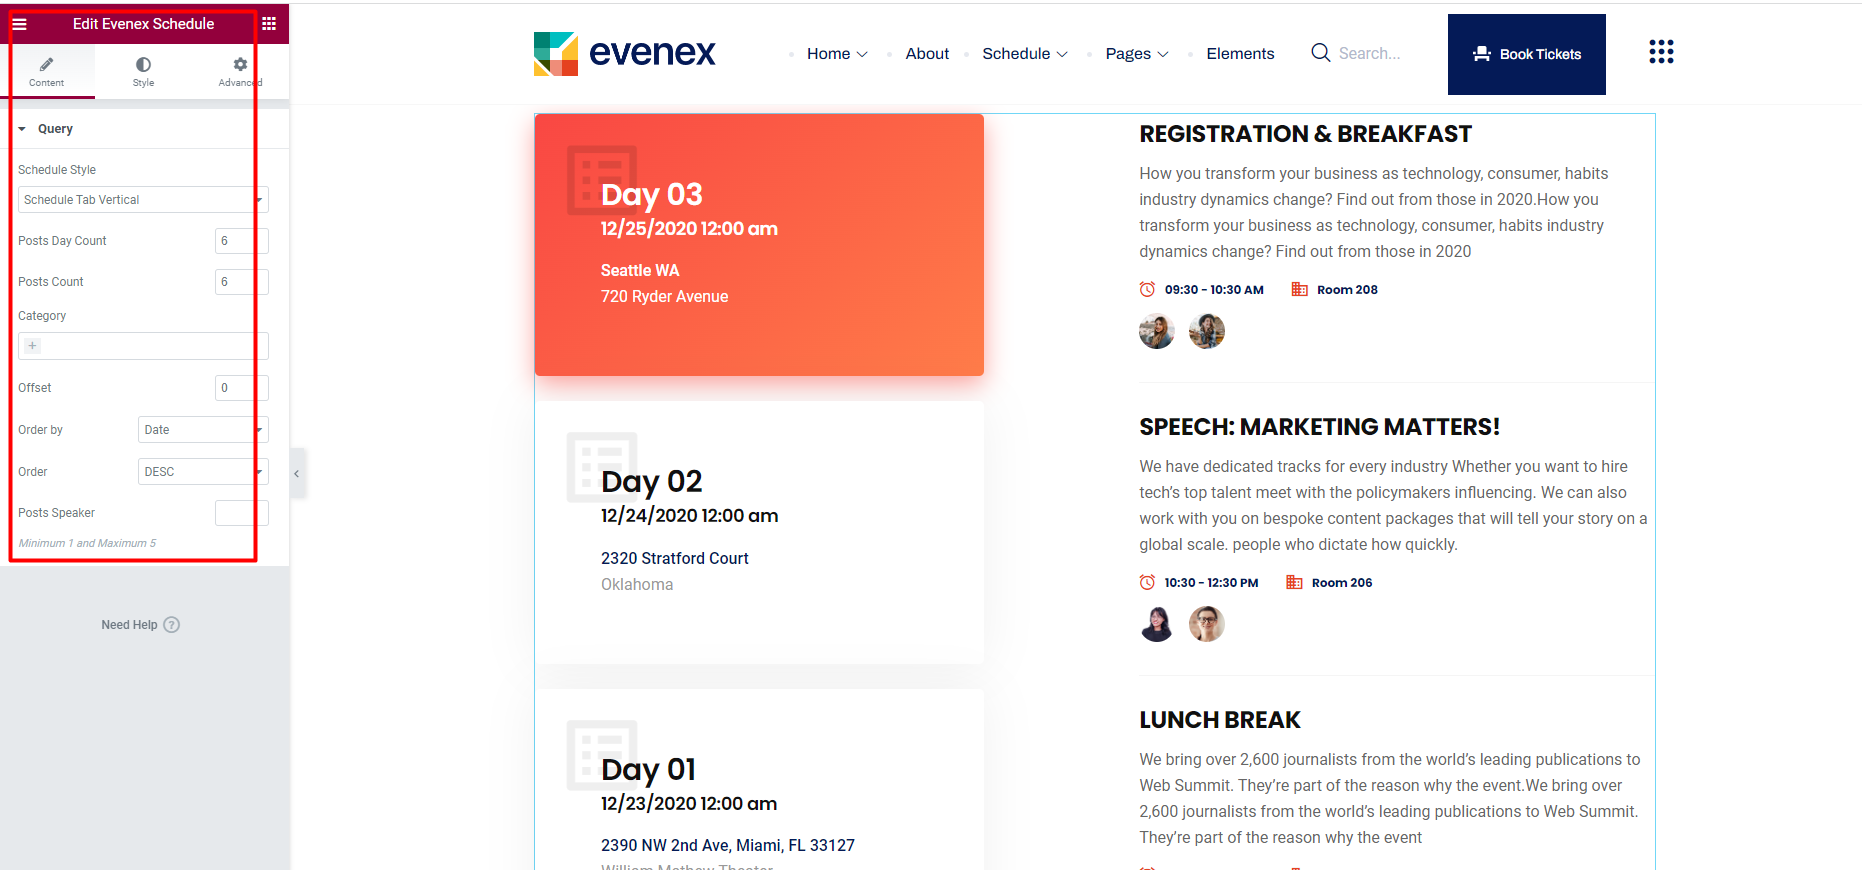
5. Modify style and configuration as your preference.
Evenex Speakers#back to top
Note: If you use the Eventin plugin to create event then please use the Eventin Speakers
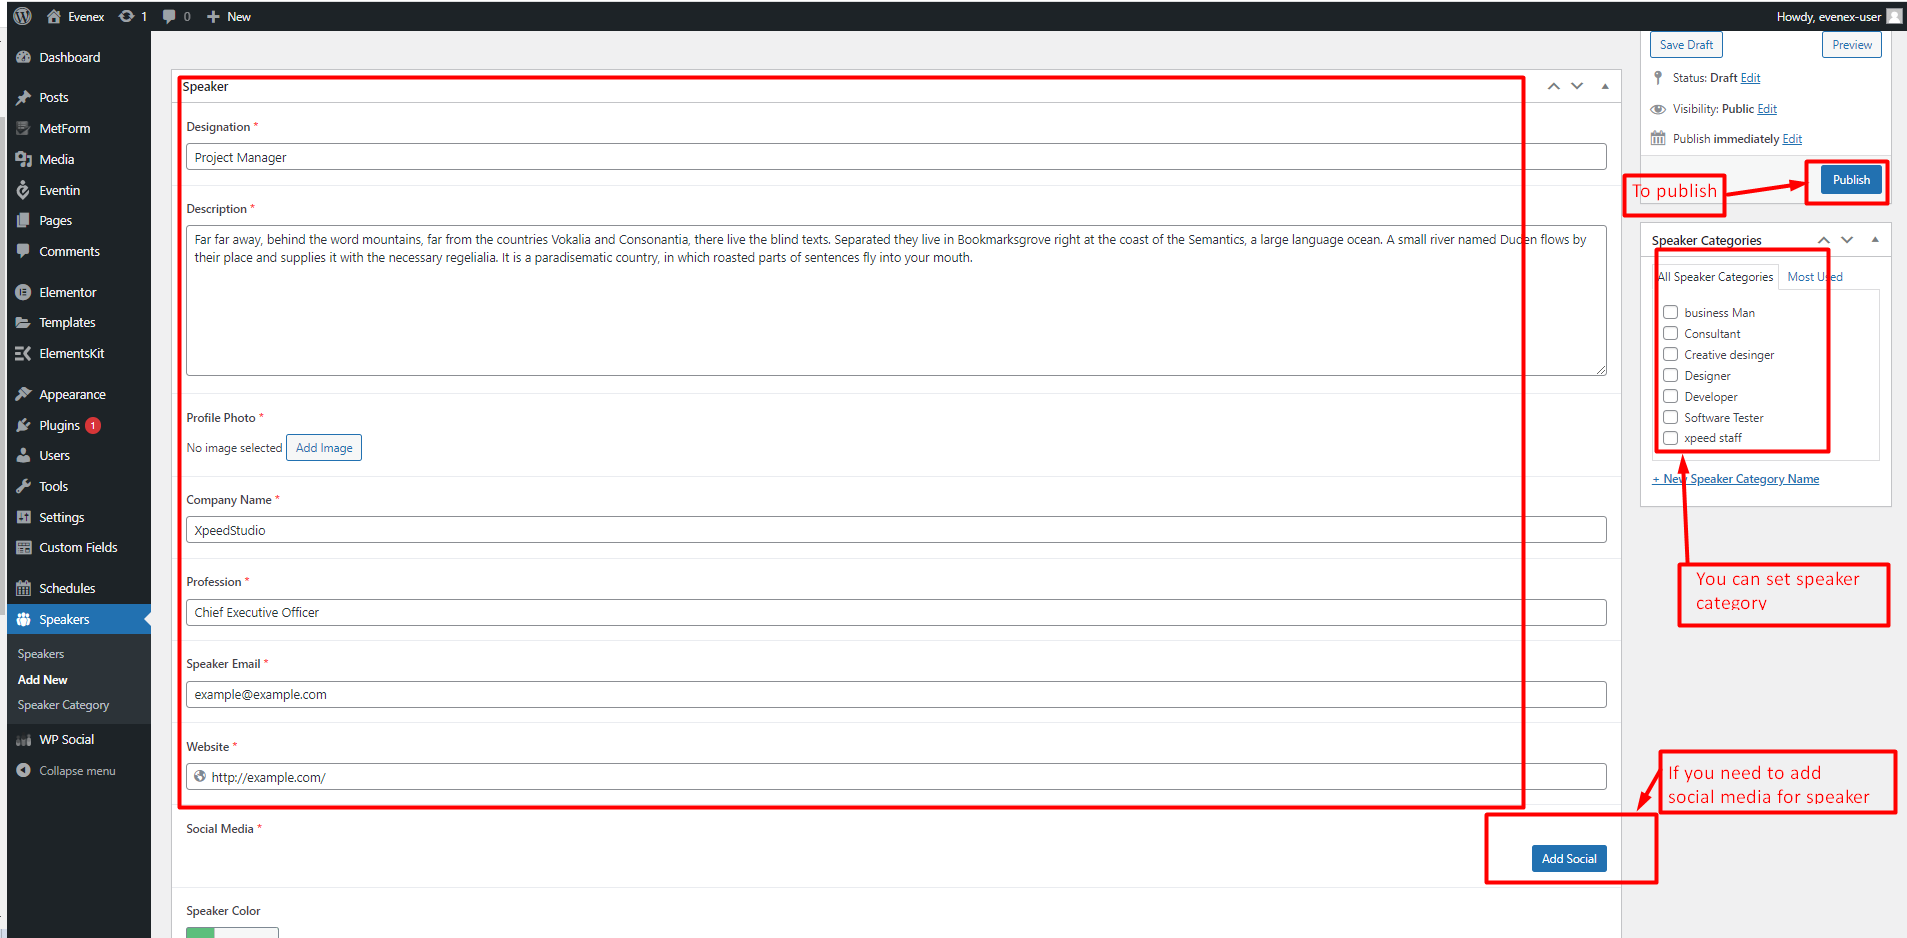
1. To create a new speaker go to your Wordpress admin panel, Speakers > Add New:
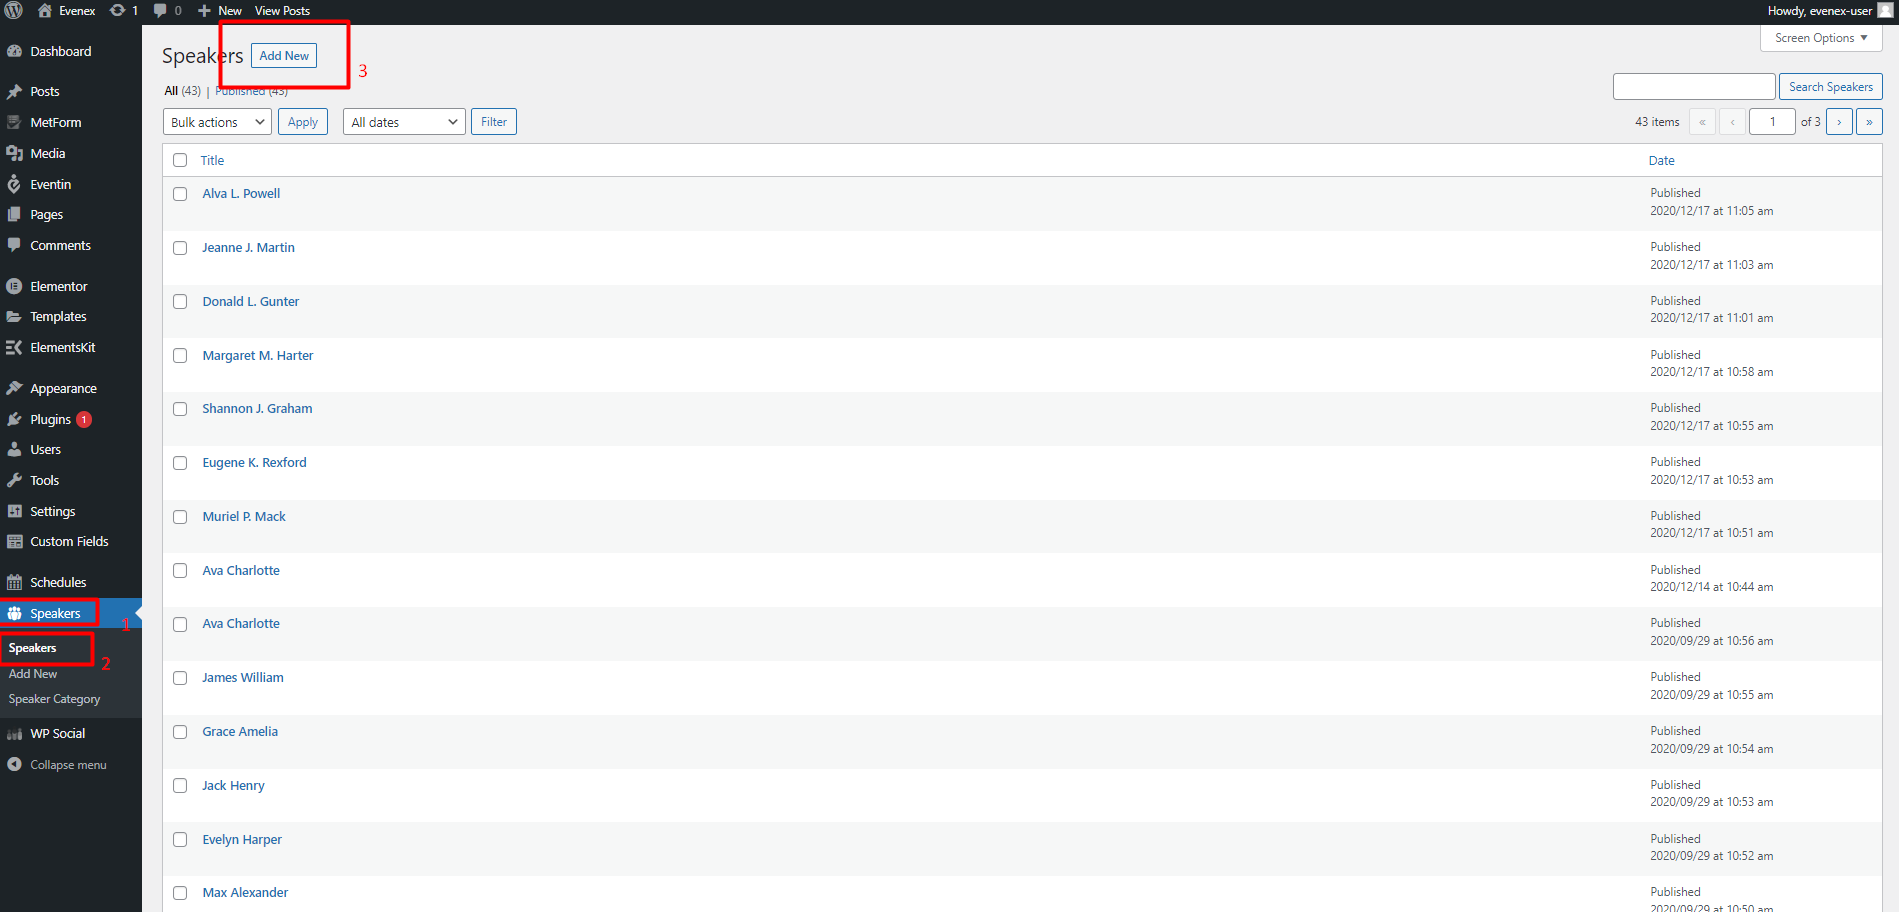
2. Enter the inputs (Required field *) and click on the Add Social button if you need to add the social media link for the speaker. Also you can select category for the speaker. Don't foget to click on the publish button to publish the speaker
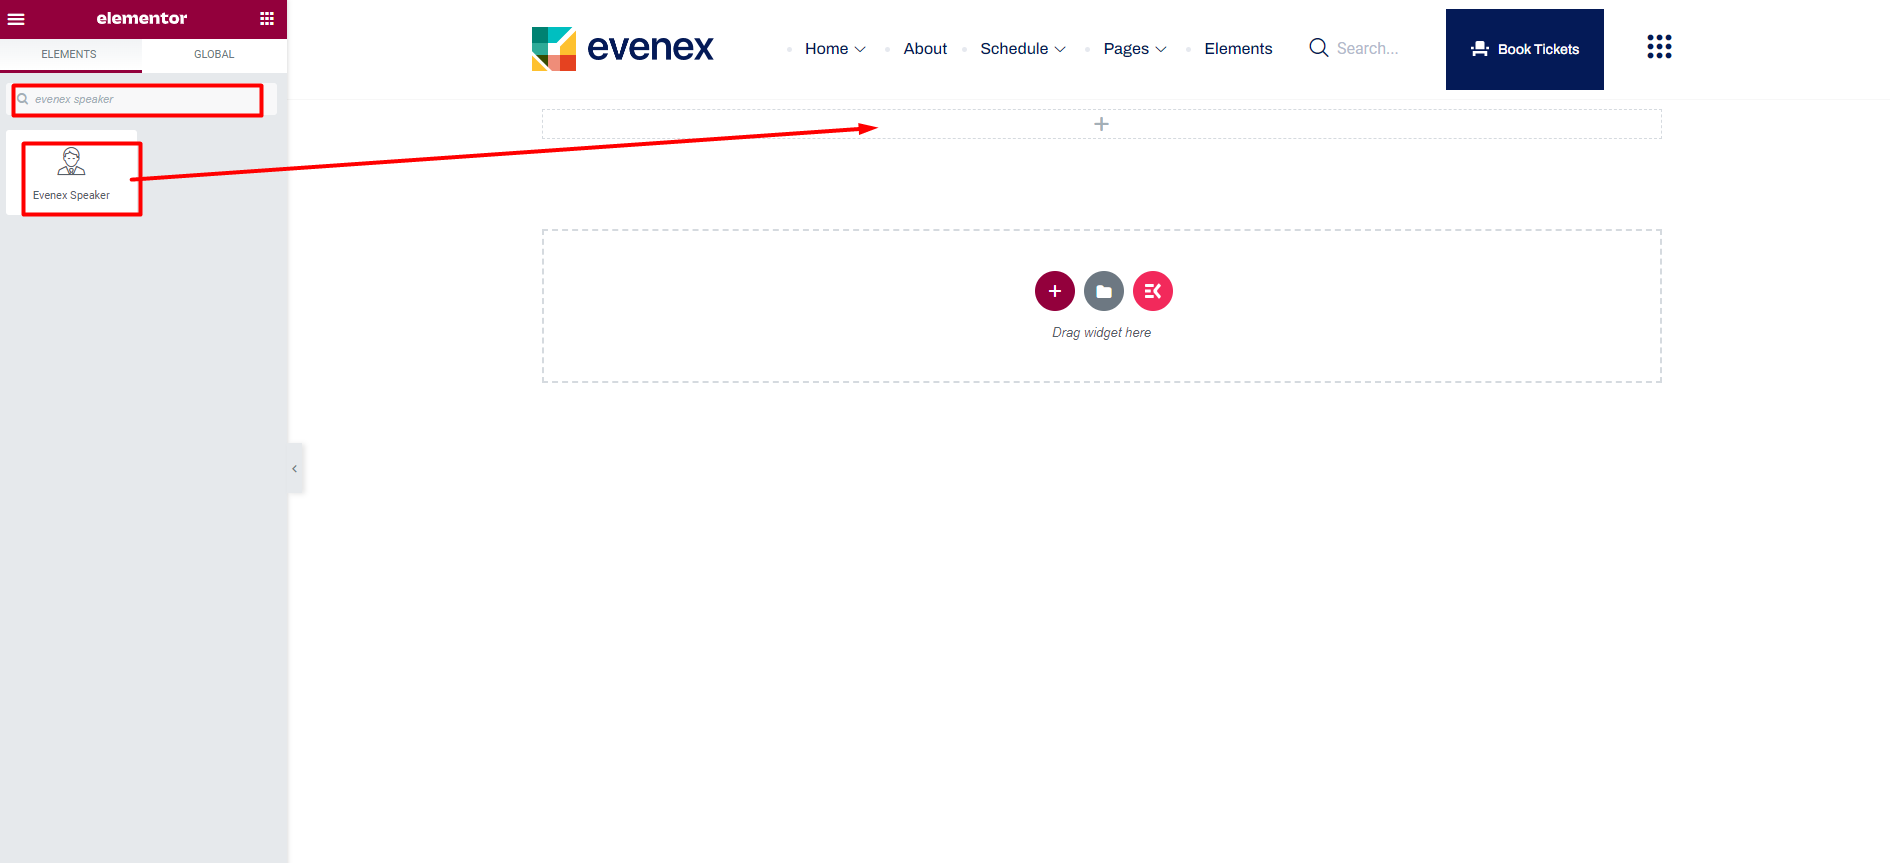
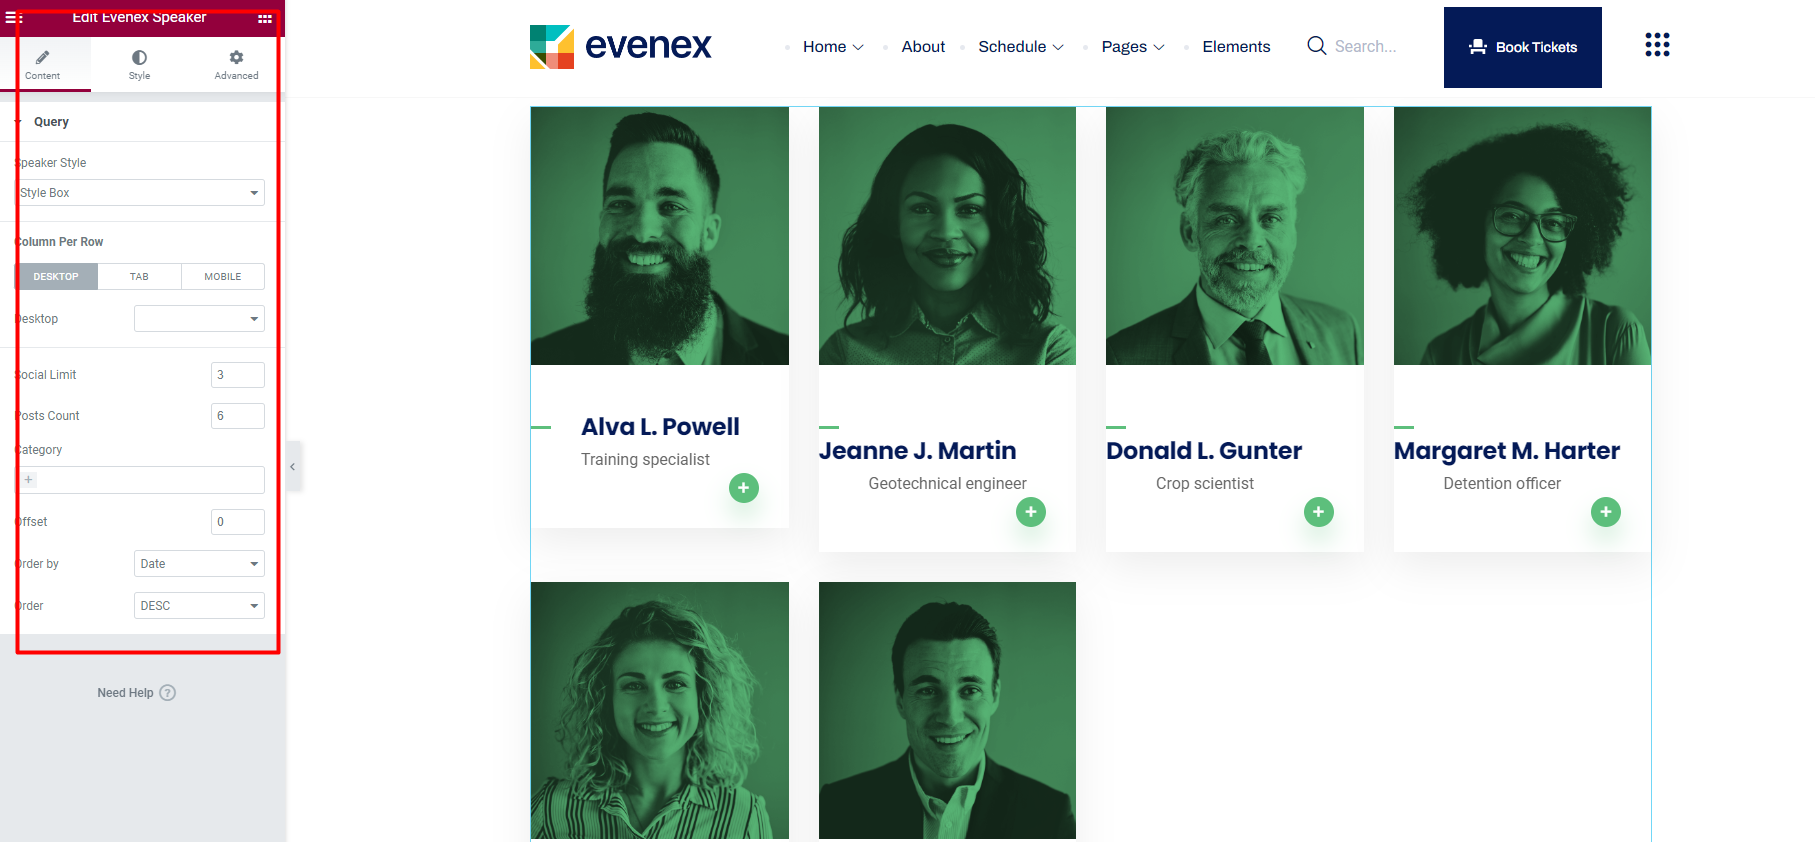
4. You can use the Evenex Speakers as elementor widget.
5. Modify style and configuration as your preference.
Eventin Events#back to
top
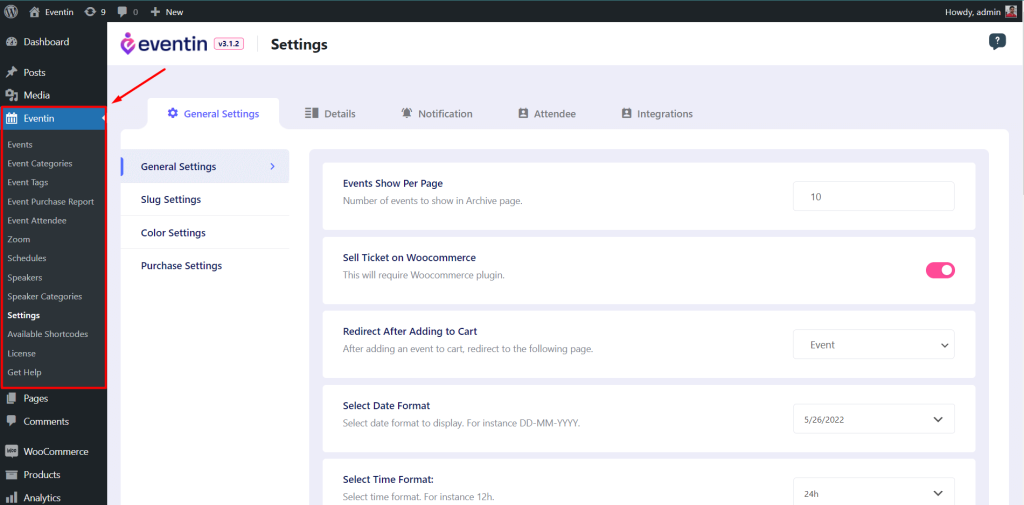
General Settings for Eventin Plugin.
Congratulations! You are ready to start creating your Event Management Website with Eventin. You can access all the settings from your dashboard.
For More Information please visit the eventin documentation.
https://support.themewinter.com/docs/plugins/plugin-docs/general-settings-eventin/general-settings/CREATE EVENT
To create a new event, go to Eventin->Events->Add New. You will then be directed to your new event page where you need to add details for your event.
For more details about single events visit here.
https://support.themewinter.com/docs/plugins/plugin-docs/event/eventin-event/EVENT SINGLE PAGE WITH ELEMENTOR
How to create an Event single page with Elementor builder.
A single event page allows you to display specific event information to the visitors so that they can easily join your event. Here you will get some specified Eventin Single Event Widgets including Event Title, Event Image, Event Price, Event Description, Add to Cart, Speakers, Schedule, etc. Using these widgets, you can easily arrange your single event page template in your desired way.
Please visit here for more details about that.
https://support.themewinter.com/docs/plugins/plugin-docs/event/event-single-page-with-elementor-builder/RECURRING EVENTS
A recurring event is helpful for repeated events like different training classes, regular sessions, monthly events, and repeated conferences. Please visit this link for more details about recurring events.
For more details please visit here.
https://support.themewinter.com/docs/plugins/plugin-docs/event/recurring-event/EVENT SPEAKER & ORGANIZER
This section will describe the process of creating and adding Speakers & Organizers for your event. You can create an unlimited number of Speakers & Organizers and display them on your event page.
For more details please visit here.
https://support.themewinter.com/docs/plugins/plugin-docs/event/eventin-speaker-organizer/EVENT LOCATION
In Eventin plugin, there are two options to add event location. You can add and view event locations through Event locations on Google Maps or manually.
For more details please visit here.
https://support.themewinter.com/docs/plugins/plugin-docs/event/event-location/EVENT SCHEDULE
You need an event Schedule to show them on your event page. Create unlimited schedules for your events then show them on your event page.
For more details please visit here.
https://support.themewinter.com/docs/plugins/plugin-docs/event/event-schedule/ZOOM MODULE
WPEventin has Zoom integrated which lets you create and share Zoom events (meetings/webinars) with your guests. You can do everything including edit, add, update and delete from the WP Eventin admin panel.
To add the zoom module and more details please visit the link.
https://support.themewinter.com/docs/plugins/plugin-docs/others-settings-eventin/zoom-meeting-2/Support Desk #back to top
Please remember you have purchased a very affordable theme and you have not paid for a full-time web design agency. Occasionally we will help with small tweaks, but these requests will be put on a lower priority due to their nature. Support is also 100% optional and we provide it for your connivence, so please be patient, polite and respectful.
Please visit our profile page or ask question mail to:[email protected]
Support for my items includes:- * Responding to questions or problems regarding the item and its features
- * Fixing bugs and reported issues
- * Providing updates to ensure compatibility with new software versions
- * Customization and installation services
- * Support for third party software and plug-ins
- * Make sure your question is a valid Theme Issue and not a customization request.
- * Make sure you have read through the documentation and any related video guides before asking support on how to accomplish a task.
- * Make sure to double check the theme FAQs.
- * Try disabling any active plugins to make sure there isn't a conflict with a plugin. And if there is this way you can let us know.
- * If you have customized your theme and now have an issue, back-track to make sure you didn't make a mistake. If you have made changes and can't find the issue, please provide us with your changelog.
- * Almost 80% of the time we find that the solution to people's issues can be solved with a simple "Google Search". You might want to try that before seeking support. You might be able to fix the issue yourself much quicker than we can respond to your request.
- * Make sure to state the name of the theme you are having issues with when requesting support via ThemeForest.
Common Error #back to top
1) The Content Area Was Not Found in Your Page
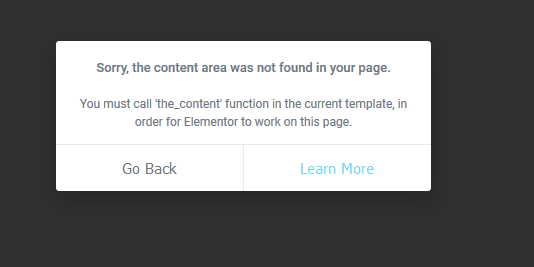
If you get this error make sure you Refresh or Flush WordPress Permalinks
1 2 3 | Step 1: In the WordPress admin area, go to “Settings > Permalinks”Step 2: Click “Save Changes”Step 3: Permalinks and rewrite rules are flushed. |
If not work you have to follow the article from Elementor Blog. The red mark steps can solve the issue.
The red mark steps can solve the issue.
2) Can’t Edit with Elementor. The editor is a blank, white page
If you get a blank page (white screen of death) when you try to edit with Elementor, it might be due to a lack of memory or to another fatal error.
Please, follow the article from Elementor Link
Also Make sure you have the following Settings on your server:
1 2 3 4 5 6 | max_execution_time = 600upload_max_filesize = 265Mpost_max_size = 265Mmemory_limit = 512Mmax_input_time = -1 |
CSS Customization#back to top
Create a css file name style.css file on
Evenx-child\style.css folder and write your own css
customization.
Some characteristics of the style.css file
- The file is not included by default
- The file is the last file to be loaded in your site.
Main css file is Evenx/assets/css/master.css
What is a Child Theme?
As indicated in the overview, a child theme inherits the look and feel of the parent theme and all of its functions, but can be used to make modifications to any part of the theme. In this way, customizations are kept separate from the parent theme’s files. Using a child theme lets you upgrade the parent theme without affecting the customizations you’ve made to your site.
Child themes:
- 1.make your modifications portable and replicable;
- 2.keep customization separate from parent theme functions;
- 3.allow parent themes to be updated without destroying your modifications;
- 4. allow you to take advantage of the effort and testing put into parent theme;
- 5.save on development time since you are not recreating the wheel; and
- 6.are a great way to start learning about theme development.
Support Desk #back to top
Please remember you have purchased a very affordable theme and you have not paid for a full-time web design agency. Occasionally we will help with small tweaks, but these requests will be put on a lower priority due to their nature. Support is also 100% optional and we provide it for your connivence, so please be patient, polite and respectful.
Please visit our profile page or ask question mail to:[email protected]
Support for my items includes:- * Responding to questions or problems regarding the item and its features
- * Fixing bugs and reported issues
- * Providing updates to ensure compatibility with new software versions
- * Customization and installation services
- * Support for third party software and plug-ins
- * Make sure your question is a valid Theme Issue and not a customization request.
- * Make sure you have read through the documentation and any related video guides before asking support on how to accomplish a task.
- * Make sure to double check the theme FAQs.
- * Try disabling any active plugins to make sure there isn't a conflict with a plugin. And if there is this way you can let us know.
- * If you have customized your theme and now have an issue, back-track to make sure you didn't make a mistake. If you have made changes and can't find the issue, please provide us with your changelog.
- * Almost 80% of the time we find that the solution to people's issues can be solved with a simple "Google Search". You might want to try that before seeking support. You might be able to fix the issue yourself much quicker than we can respond to your request.
- * Make sure to state the name of the theme you are having issues with when requesting support via ThemeForest.
Version History (Changelog) #back to top
You can check changelog on template sales page on Themeforest
Once again, thank you so much for purchasing this theme. As I said at the beginning, I'd be glad to help you if you have any questions relating to this theme. No guarantees, but I'll do my best to assist.
Changelog
Current Theme Version 2.2 (see Change log at the bottom of Themeforest Item Description Page)